In summary:
- Swap damaging white torchlight for red light to remain invisible to most nocturnal mammals.
- Learn to read the “ground language” of tracks and scat to locate animals before you see them.
- Use thermal monoculars for initial detection and night vision for positive identification, a two-step process.
- Prioritize predator-proof sanctuaries; they offer the most ethical and successful viewing opportunities.
- Master the safety rules to ensure you are a respectful guest in their home, not a threat.
The Australian bush breathes differently after dark. A hush falls, punctuated by the snap of a twig or a call you can’t quite place. For the dedicated wildlife watcher, this is when the true magic begins, when the world of reclusive, nocturnal marsupials awakens. Yet, many forays into the night end in frustration, with nothing to show but startled eyeshine in the glare of a torch before an animal flees into the darkness. The common approach—grab a bright light and hope for the best—is often the very thing that guarantees failure.
The problem is a fundamental misunderstanding of the nocturnal world. It’s a realm governed by sound, scent, and incredibly sensitive vision adapted to low light. A blast of white light is not just an annoyance; it’s a blinding, terrifying event that can disorient an animal for critical minutes. The secret to truly seeing these creatures isn’t about overpowering the darkness. It’s about becoming part of it. It’s about practicing a philosophy of minimal impact observation, making yourself sensorily invisible.
This guide won’t just give you a checklist. It will share the whispered secrets of a night guide. We will move beyond simply what to do, and explore the crucial *why* behind each technique. You will learn to see the world through their senses, to read the subtle language of the bush, and to choose your tools not for what they let you see, but for how they allow you to remain unseen. This is how you transform a fleeting glimpse into a prolonged, breathtaking encounter.
To guide you through this silent craft, we’ve structured this article to build your skills progressively. From understanding the science of night vision to interpreting the faintest signs on the ground, each section will reveal another layer of the art of nocturnal observation.
Summary: How to Spot Nocturnal Marsupials in the Wild Without Disturbing Them?
- Why white torchlight temporarily blinds nocturnal animals and alters their behavior?
- Scat and tracks: how to read the ground to find a bilby burrow?
- Thermal monoculars vs night vision: which is better for spotting gliders in trees?
- The only diurnal marsupial: where in Western Australia can you see a numbat?
- Why fenced sanctuaries are your best chance of seeing a bettong in the wild?
- Dusk or feeding time: when are devils most active and vocal?
- Settings for twilight: capturing fur details without using a flash that scares them
- Interacting with Australian Wildlife: 5 Safety Rules to Prevent Injury
Why white torchlight temporarily blinds nocturnal animals and alters their behavior?
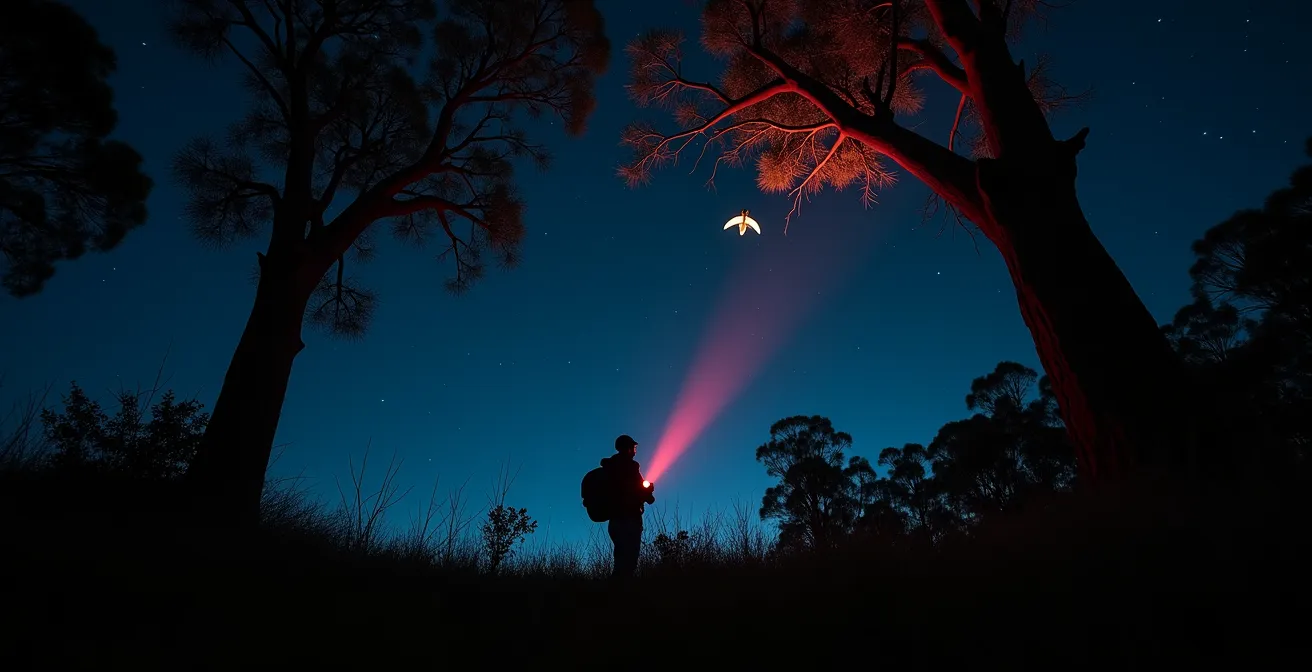
To a nocturnal animal, your bright white torch is the equivalent of a flashbang grenade. Their eyes are packed with light-sensitive rod cells and a reflective layer called the tapetum lucidum, the source of that familiar “eyeshine.” This system is designed to amplify the faintest starlight. A sudden, intense blast of white light overloads it completely, bleaching the rhodopsin photopigment in their rods. This causes temporary blindness and disorientation that can last up to 30 minutes, leaving the animal vulnerable and stressed. It’s the most common mistake observers make, and it instantly shatters any chance of natural observation.
The key is to become invisible to their specific sensory world. Most nocturnal mammals are dichromats, meaning they have poor colour vision and are largely insensitive to long-wavelength light. This is our secret advantage. Light in the red spectrum (above 600nm) is almost imperceptible to them, but remains visible to our trichromatic human eyes. Using a red light isn’t just a polite suggestion; it is the absolute foundation of ethical night observation. It allows you to navigate and spot without triggering their alarm systems. The goal is to see them, not to announce your presence with a beacon of light. True light discipline means using the least invasive light possible.
- Priority 1: No light at all – Allow your eyes to adapt for 20-30 minutes and use natural moonlight and starlight whenever possible. This is the purest form of observation.
- Priority 2: Red light only – This should be your default setting for walking and scanning.
- Priority 3: Filtered amber/orange light – Less disruptive than white, but more noticeable to animals than red. Use with caution.
- Priority 4: Intermittent white light – A last resort for brief, positive identification. If you must use it, close one eye to preserve its night vision.
Scat and tracks: how to read the ground to find a bilby burrow?
Long before you see a nocturnal animal, it leaves behind a story written on the earth. Learning to read this “ground language” is a fundamental skill that turns a hopeful wander into a targeted search. Instead of scanning the trees aimlessly, you should be scanning the ground for the subtle clues that betray an animal’s presence and habits. For a creature like the greater bilby, these signs are unmistakable once you know what to look for. Their movements and feeding behaviors leave a unique signature in the sand and soil.
The first step is to look for their distinctive burrows. A bilby burrow isn’t just a simple hole; it’s a spiral-shaped tunnel that can be up to 3 meters long. An active burrow system will often have multiple entrances. But the most telling signs are often nearby: look for numerous small, conical “foraging pits” where the bilby has used its strong front claws to dig for insects and seeds. These pits are a clear indication that an animal is active in the area.

The tracks themselves are also highly distinctive. The bilby has an asymmetrical, “loping” gait, which leaves a track pattern different from the more uniform prints of feral cats or rabbits. Look for the impression of its long hind feet paired with the smaller front feet. Finally, bilby scat consists of small, dark pellets that often contain visible fragments of insect exoskeletons, a direct clue to their diet. Finding these signs together—burrow, pits, tracks, and scat—tells you you’re not just in the right habitat; you’re in a specific animal’s territory.
Thermal monoculars vs night vision: which is better for spotting gliders in trees?
Once you’ve mastered light discipline and ground language, technology can extend your senses, but it requires a strategic approach. The two primary tools for night observation are thermal imaging and traditional night vision, and they are not interchangeable. They answer two very different questions. Thermal imaging answers: “Is there anything warm-blooded out there?” Night vision answers: “What is the shape and pattern of that thing I’m looking at?” For spotting an arboreal marsupial like a sugar glider high in the canopy, this distinction is critical.
The following table breaks down the core differences, which highlights why the best approach is often a two-step process: scan with thermal, identify with night vision.
| Feature | Thermal Imaging | Night Vision |
|---|---|---|
| Detection Range | 300+ meters for heat signatures | 150-250 meters with ambient light |
| Canopy Penetration | Excellent – detects through foliage | Poor – blocked by leaves |
| Weather Performance | Works in fog, light rain | Degraded by moisture |
| Species ID Accuracy | Low – heat blob only | High – fur patterns visible |
| Best For | Initial detection/scanning | Positive identification |
A thermal monocular excels at initial detection. It will pick up the faint heat signature of a tiny glider through a screen of leaves that would render it completely invisible to night vision or the naked eye. However, at a distance, all you will see is a warm “blob.” This is where you switch to a night vision device or, if close enough, a careful use of red light. Night vision amplifies ambient light to reveal fur texture, eye shape, and body form, allowing for a positive species identification.
For pure detection capability, thermal wins hands-down – if it’s warm, you’ll see it. For identification at closer range, night vision can sometimes give a clearer picture (you might tell the difference between two similar bird species by plumage only with night vision or daylight optics, whereas thermals would just show both as similar heat shapes).
– SWATCOM Wildlife Equipment Specialists, The Ultimate Guide to Thermal Imaging for Wildlife
The only diurnal marsupial: where in Western Australia can you see a numbat?
While this guide focuses on the nocturnal world, there is one remarkable exception that every wildlife enthusiast should know: the numbat. This fascinating, termite-eating marsupial breaks the mould by being almost exclusively active during the day (diurnal). This is a direct adaptation to its highly specialized diet; its sole food source, termites, are most active during the warmer parts of the day. Spotting one requires a complete reversal of nocturnal techniques, trading hushed nights for patient, sun-drenched days.
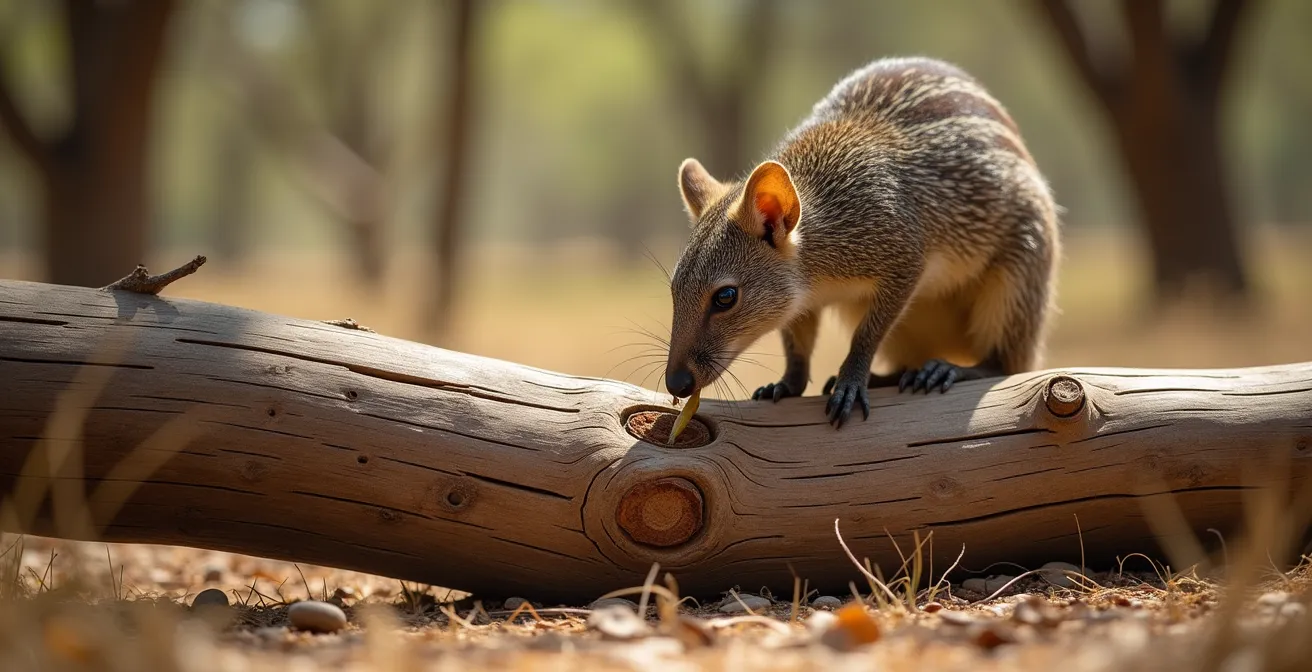
The numbat is one of Australia’s rarest marsupials, and its range is now largely restricted to specific pockets of Western Australia. Your absolute best chance of an encounter is in the Dryandra Woodland, a critical habitat for one of the last two remaining wild populations. But even here, success requires insider knowledge. These animals are small, about the size of a squirrel, and their striped coat provides excellent camouflage against the woodland floor.
The secret, shared by conservation teams, is to use your vehicle as a slow-moving hide. Numbats are most active between 10am and 2pm, especially during the cooler months when they are warming themselves. The key is to drive excruciatingly slowly—under 20 km/h—along the gravel roads within the woodland, particularly the Kawana-Contine scenic drive loop. Scan the verges and the bases of wandoo trees for the flick of a bushy tail or the distinctive, pointed nose investigating a fallen log for termites. This slow, patient patrol is the most effective method for spotting this elusive daytime jewel.
Why fenced sanctuaries are your best chance of seeing a bettong in the wild?
There’s a common misconception among wildlife purists that a fenced sanctuary is somehow “less wild” or an inferior experience. This could not be further from the truth, especially for critically endangered species like the eastern bettong. The reality is that these sanctuaries are not zoos; they are restored ecosystems. By erecting specialized predator-proof fences to exclude feral cats and foxes—the primary drivers of extinction for small marsupials—these havens allow natural processes and behaviors to return.
Within these protected areas, populations can recover without the constant, overwhelming pressure of introduced predators. The success is staggering; in places like Mulligans Flat Woodland Sanctuary, reintroduced populations of the once locally-extinct eastern bettong have thrived. Studies show that within these havens, survival rates can reach over 95%, a figure impossible in unfenced landscapes. This security allows the animals to forage openly and behave as they would have a century ago, offering you a glimpse into a healthier, more balanced version of the Australian bush. For many species, it is the only place you can see them exhibit this full range of natural behavior.
However, not all sanctuaries are created equal. Choosing an ethical, conservation-focused operation is paramount. A responsible sanctuary prioritizes animal welfare and ecological restoration over pure tourism. Before you visit, it’s crucial to do your homework to ensure your presence is contributing to a positive outcome.
Your checklist for choosing an ethical sanctuary
- Mission and Partnerships: Check for a clear conservation mission statement and active partnerships with universities or research organizations.
- Tour Group Size: Verify that tour group sizes are strictly limited, ideally to a maximum of 8-12 people, to minimize disturbance.
- Light Policy: Confirm that the sanctuary enforces a strict red-light-only policy for all nocturnal viewing tours.
- Breeding Programs: Look for sanctuaries that are actively involved in breeding programs for endangered species for reintroduction purposes.
- Revenue Allocation: Ensure that a significant portion of the revenue from tours and visits is directly reinvested into their conservation and research programs.
Dusk or feeding time: when are devils most active and vocal?
The Tasmanian devil, the world’s largest surviving carnivorous marsupial, operates almost entirely under the cover of darkness. As a primarily nocturnal hunter and scavenger, its activity patterns are dictated by the setting sun. While you may get a lucky glimpse of one resting during the day, your best chance for an encounter is to focus on the transitional period of dusk and the hours that follow.
This carnivorous marsupial is largely nocturnal, foraging and hunting primarily under the cover of darkness
– Australian Wildlife Research Team, Australia’s Secretive Nocturnal Wildlife After Dark
Observing devils is often an auditory experience before it is a visual one. They are famously vocal, especially during social interactions like communal feeding. Research on the thriving introduced population on Maria Island in Tasmania has shown that peak vocalization occurs at dusk during these feeding sessions. Listen closely for a truly unique and rather terrifying symphony of sounds used to establish a feeding hierarchy: deep growls, blood-curdling screeches, and a series of sharp huffing sounds. These noises can carry a long way in the still night air and are a dead giveaway that devils are active and feeding nearby.
Finding a carcass (such as wallaby roadkill, in areas where this is common and safe to observe from a distance) can be a hotspot for activity. Position yourself quietly downwind well before sunset and simply wait and listen. The sounds will often start just as the last light fades. This is when their social dynamics are on full display, offering a powerful and memorable insight into the life of this iconic species, which has been successfully breeding across Tasmania since reintroductions began.
Settings for twilight: capturing fur details without using a flash that scares them
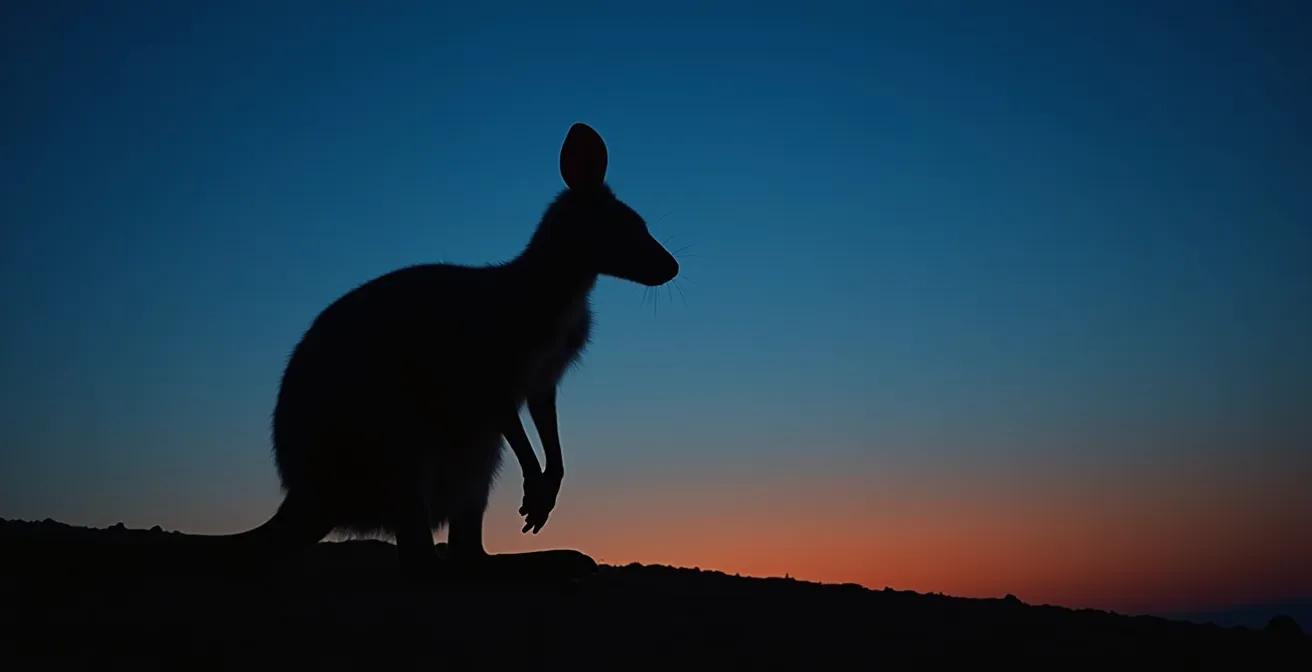
For the wildlife photographer, the ultimate challenge is capturing the magic of a nocturnal encounter without destroying it. Using a flash is out of the question; it’s harmful to the animal and goes against every principle of minimal impact observation. The art lies in harnessing the faint, ambient light of twilight and pushing your camera’s capabilities to their absolute limit. It’s about trading the convenience of a flash for the satisfaction of a truly natural, ethical image.
One of the most powerful techniques is to embrace silhouettes. Instead of trying to light your subject from the front, position yourself so the animal is between you and the last glow of the twilight sky. This creates a beautiful rim-lighting effect, where the fading light catches the edge of the animal’s fur, outlining its shape and texture in exquisite detail. This method requires no artificial light and produces dramatic, evocative images.
To capture detail in such low light, you need to take full manual control of your camera. This means balancing the “exposure trinity”—aperture, shutter speed, and ISO—to gather as much light as possible while avoiding motion blur. Shooting in RAW format is non-negotiable, as it gives you the maximum flexibility to recover details from the shadows and highlights in post-processing without degrading image quality.
- The Low-Light Trinity: Start with a high ISO (3200-12800), the widest aperture your lens allows (f/2.8 or wider), and the slowest shutter speed you can hand-hold (at least 1/125s to freeze slight movement).
- Focusing: Switch to manual focus. Use your camera’s “live view” zoomed in to nail focus, or assign autofocus to a back button to prevent the lens from “hunting” in the dark.
- Metering: Use spot metering and meter on the brightest part of the animal’s fur to avoid blowing out the highlights from eyeshine.
- Stabilization: Enable image stabilization (IS/VR) for handheld shots, but turn it off if you are using a stable tripod.
- Exposure Compensation: Set your exposure compensation to -1 to start. This helps preserve the highlights and prevent the bright eyeshine from tricking your camera’s meter.
Key takeaways
- The foundation of all nocturnal wildlife spotting is light discipline; red light is non-negotiable to remain unseen.
- Technology is a strategic tool: use thermal imaging for wide-area detection and night vision for close-range identification.
- Counter-intuitively, predator-proof sanctuaries often provide the most authentic viewing of natural behaviors by removing the primary threat of introduced predators.
Interacting with Australian Wildlife: 5 Safety Rules to Prevent Injury
Every principle we’ve discussed is underpinned by one final, crucial concept: respect. When we enter the bush, we are guests in an animal’s home. Our goal is to observe, not to interact. Maintaining a safe distance and understanding an animal’s stress signals is not only essential for our own safety but is the ultimate sign of a responsible observer. An animal that feels safe and unthreatened is one that will continue its natural behaviors, providing a far more rewarding and prolonged encounter. Forcing an interaction or getting too close will only ever result in the animal fleeing, or in the worst-case scenario, defending itself.
Adhering to a strict code of conduct protects both you and the wildlife. These rules are simple, but they are absolute. They ensure that your presence is a passive one, leaving the animals undisturbed and the ecosystem as you found it. This includes recognizing that even seemingly placid animals like wombats or kangaroos can cause serious injury if they feel cornered or threatened.
- Apply the ‘Rule of Thumb’: This is the simplest way to gauge a safe distance. Extend your arm fully. If you cannot cover the entire animal with your thumb, you are too close.
- Recognize Stress Signals: Learn the animal’s body language. A kangaroo licking its forearms is not grooming; it’s a sign of stress and overheating. A wombat shaking its head is showing agitation. These are signals to back away slowly.
- Never Touch or Feed Wildlife: This is a cardinal rule. Feeding animals disrupts their natural diet and can cause dependency, while touching them poses a risk of transmitting zoonotic diseases like sarcoptic mange or giardia.
- Use Your Vehicle as a Hide: Your car is an excellent observation blind. Park quietly, turn off the engine and lights, and observe through the windows. Most animals perceive a vehicle as a non-threatening part of the landscape.
- Keep Their Escape Route Clear: Always position yourself so that the animal has a clear, unobstructed path to retreat. Never corner an animal.
Wildlife spotting has to be done with care. Think of yourself as a guest in someone else’s home.
– Australian Conservation Foundation, Want to see Australia’s rare and remarkable species for yourself?
Now that you have the secrets of a night guide, the next step is to put them into practice. Go out, be patient, be silent, and become part of the darkness. Your reward will be a glimpse into a world few ever get to see.